Today we are finally going to see how we can integrate the SketchUp work we’ve been doing since week one with the other spatial and historical information we’ve been collecting with ArcScene, the 3D equivalent of ArcMap that is part of the same ArcGIS for desktop suite of programs. The basic process involves starting with a 2D building footprint layer and creating new 3D building models from them in ArcScene. These models can then be replaced by already built SketchUp models, or exported and used as the basic massing in SketchUp or other modeling software where you can add detail and textures to create more accurate 3D models.
The key to this process is the COLLADA file format (extension .dae). This is yet another XML-based schema which, like any good XML file, allows interoperability and data transfer between applications, in this case allowing us to move 3D assets between different modeling, GIS, and animation software.
Our basic ArcGIS > SketchUp workflow will be:
- Create building footprints in ArcMap
- Build a 3D environment in ArcScene by setting up a DEM
- Extrude footprints in ArcScene
- Save 3D layer by converting to a Multipatch Feature Class in a GeoDatabase
- Using “Layer 3D to Feature Class” tool
- Export SketchUp model to Collada (.dae) format
- Back in ArcS, Replace model w/SketchUp output
The result should be a shiny 3D model of campus which we can animate and share!
We’ve already created our building footprints layer in ArcMap, so let’s jump in at step two.
Exercise: Setting up a DEM
A  DEM is a Digital Elevation Model: a raster file that represents surface heights as a regular grid of altitude values. These can be used to perform spatial analyses like calculating slope, watersheds, shadows, etc., can serve as topographical base layers to drape other 3D layers over, or be used to generate a vector based representation of the physical land surface known as a Triangulated Irregular Network or TIN.
ArcScene’s default is to treat everything as flat and let you dictate where the vertical z-axis values should be read from, so our first step is to add the DEM and use it as our elevation layer.
- Launch ArcScene
 In the ArcScene Catalog side bar, open a new folder connection to the 3D_Mapping folder
- Drag the dem_rice elevation model into the map viewer
This is a cropped elevation model of Rice County depicting the area near campus, but you’ll notice that it actually looks flat in ArcScene. We need to set this up as a 3d surface.
- Right click on the layer name and select Properties…
- Go to the Base Heights tab and set Elevation from surfaces to Floating on a custom surface.
- I
 n the drop down bar select the demo_rice later and hit OK
Since the terrain we are modelling is relatively flat we can increase the Z scaling by adding a custom elevation factor. Do the below to see how it looks, but then set it back to 1. If you leave it exaggerated the output of later steps will be off.
- Under Properties in the Base Heights tab,
- Change the Elevations from features value to 2
- Hit Apply to see the result
- Change the Elevations from features value back to 1
- Hit OK again

Exercise: Extrude Basic Footprints
 Next we’ll add our building footprints and drape them over this terrain surface we just created.
- From the 3D_Mapping folder, drag the 1916Buildings.shp shapefile into the map
- Make sure it is above the DEM layer in the table of contents.
Notice that our building polygons are underneath our terrain, since they haven’t been given an elevation value yet and are sitting at sea level. We have to tell the layer to use the DEM’s height values tol ‘lift’ the footprints and drape them over the terrain layer the same way we did earlier.
- Right click on the 1916Buildings layer and open the layer Properties > Base Heights tab.
- Set the Elevation from surfaces to Floating on a custom surface and choose the demo_rice layer
- Change the Elevations from features value to 2 again and hit OK.
We now have 2D buildings on a 3D surface. But we want to see this look like the real campus, with three dimensional buildings. We’ll start by ‘extruding’ the 2D footprints to look like 3D objects.
 Right click on the 1916Buildings layer and open the layer Properties > Extrusion tab.
- Check the box for Extrude features in layer.
If we had an attribute in our data table for the building heights, we could use it at this stage to give them all their proper heights. But we don’t, so we are just going to start by setting a uniform height to all the buildings. The value entered here is always in whatever units the data projection is in (meters in this case). There are also multiple possibilities for how to apply the extrusion. We are going to apply it the maximum base height so that all buildings stand proud of the surface and have flat, level roof tops.
- In the Properties > Extrusion tab, enter 10 for the Extrusion value,
- Set the Apply extrusion by drop down to adding it to each feature’s maximum height.
- Hit OK.
You should now have a scene that is starting to resemble the real world, with 3D buildings on a 3D terrain.

Exercise: Convert to 3D Feature Class
So far we’ve created what look like 3D buildings in the GIS. But as far as the software is concerned these are really still just 2D features with a cool 3D trick applied to them. If we want to save the 3D version, do any 3D analysis, or import more realistic models, we need to convert these to an actual 3D feature layer called a multi-patch.
 There’s a bug in the system that we have to work around (something that happens too often in ArcGIS!), so first lets turn off background processing so we don’t get an error.
- Go to the Geoprocessing menu and open the Geoprocessing Options window.
- Under Background Processing UNCHECK Enabled
- Hit OK.
Now we can actually convert to 3D. The tool to do so is located in the red ArcToolbox tool. There are a ton of tools in here, and they are heavily nested in multiple submenus. You can dig around trying to find the one you want, but it’s much easier to use the Search tool to find it quickly.
 Bring up the Search tab in the right side bar
- Highlight the Tools category and search for the Layer 3D to Feature Class (3D Analyst) conversion tool and click its title to launch it
- Set the input feature class to 1916Buildings
- Choose the Carleton1916 geodatabase and save the output file as c1916Buildings_3d.
Although the new layer looks just like the extruded footprints layer, ArcScene treat one as a fully 3d model, with volume and textures, and the other as an essentially 2d layer tricked into 3d (sometimes called 2.5d). With our new multipatch layer we can perform 3D analysis or swap and modify our building models.

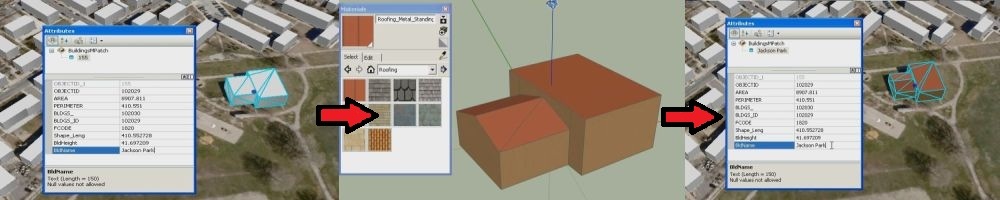
Exercise: Import a SketchUp model
Now it’s finally time to import our textured 3d models from SketchUp and swap them in. The benefit of this approach is that our new model will not only have geographic coordinates attached to it, but all of the attribute data that our original GIS layer had!
- Open your 3d building model in SketchUp
- Go to File > Export > 3D Model… and change the Export Type: to COLLADA File (*.dae)
- Back in ArcScene turn on the 3D Editor tool bar if it’s not on already by going to Customize > Toolbars > 3D Editor
- In the 3D Editor tool bar select Start Editing
- Change your cursor to the blue and white Select Features tool
- Select the building that you want to swap out for your SketchUp model
- In the 3D Editor dropdown select Replace With Model and navigate to the new COLLADA file you exported from SketchUp
- If the alignment or rotation is not perfect, switch to the Edit Placement tool and rotate (click and hold center mouse button) or move (click and hold left mouse button) the model to its correct orientation.
Congratulations! You should have a fully textured 3D model in ArcScene, ready for analysis, animation or visualization.
Resources
The workshop steps above were modified from this tutorial form the Stanford Geospatial Center.
3D Site Modeling in Context at Paul Cote’s GIS Manual gives great advice on how to managed workflows between multiple 3D applications.
The two videos below from Green Mountain GeoGraphics illustrate similar workflows for moving back and forth between SketchUp and ArcScene